Pages

Sunday, January 31, 2010

Revisit: Taco Pie

Happy Birthday, Mom!


Source

Yes, that is actually a cake! My mom's been a piano teacher for over 30 years so I thought this was fitting!


In July I shared my taco aka firework pie with you. It's still at the top of Johnny's list!

When we cooked the queso fundido I thought it was going to be a lighter meal, an appetizer of sorts, and this pie would be the main course.

Wrong! The queso fundido filled us both up, but luckily I hadn't thrown this pie in the oven yet. I assembled it up to the point of baking, threw plastic wrap on it and left it in the fridge for the next night's dinner.

What a great feeling to have dinner already made the next day. From that point all I needed to do was turn the oven on and pop this pre-made dish in for 30 minutes.

Delicious as ever, served with sliced avacado and sour cream on top. There are enough leftovers for Mexican dinner #3 of the week!

In other exciting news I was a runner up for Pioneer Woman's Vocabulary Quiz #1!

Johnny and I raced through the answers and managed to be lucky comment #166 to win a $75 Amazon gift certificate! We've entered about a dozen of her Smartypants quizzes, only getting all the answers correct for maybe 4 or 5. It was really cool to finally win a prize in one! Now if only I could be so lucky when she's giving away Le Crueset sets or Kitchenaid Mixers!!

Thursday, January 28, 2010

Queso Fundido con Rajas y Chorizo

Translation: Melted cheese with roasted peppers and chorizo. Verdict: Yum.

If any of you have watched Top Chef or Top Chef: Masters you know who Rick Bayless is. He's been a favorite celebrity chef of Johnny's and mine because he's local so his restaurants and Frontera products are accessible and he's mastered one of our favorite cuisines: Mexican. The attention to detail and love that Rick pours into learning Mexican food is really impressive, as is his sharing of the craft. Rick and his wife lived in Mexico and studied every little in and out of local cuisine.

Since 2003 Rick has hosted Mexico: One Plate at a Time on PBS, which Johnny and I have a few seasons of on DVD and it's better than anything currently on Food Network. He's written five award-winning cookbooks, one of which we own a signed copy of. (No, we weren't lucky enough to witness the signing, Johnny's SIL won it in a gift basket and generously gave Authentic Mexican Regional Cooking from the Heart of Mexico to us!)

He's also really respectful and responsible in his ingredient usage. He was a founding member of Chefs Collaborative for environmentally friendly practices, and he uses only sustainable seafood. Him and his staff started the Frontera Farmer's Association, his charity of choice on Top Chef: Masters, which provides grants to local family farms.

As you can tell, I really like and respect Rick, so imagine my delight when I tweeted him for chorizo suggestions from our cookbook and he tweeted me back with two recipes and their page numbers! I love that I got a personal recommendation from the cookbook author and chef himself! He's such a cool guy, he tweets often and makes himself accessible to his fans, answering questions left and right.

This recipe made enough to fill 6 tortillas and was a little deceiving in the fact that so little can be so filling! Johnny had three, I had two, and it was plenty!

2 Tbsp vegetable oil
1/2 small onion, thinly sliced
1 fresh chile poblano, roasted, peeled, seeded, thinly sliced
4 oz (1/2 cup) chorizo sausage
8 oz (2 cups) melting cheese *see note

Roast the poblano over the open flame of a gas burner until the skin is blistered and black. If you do not have a gas stove you can cook these under the broiler of your oven.


Carefully rinse the skin off under water and remove the seeds and membrane. Slice into strips.

Turn the oven to 375° and set a pie pan or ramekin inside to heat while the oven comes up to temperature.

In a medium skillet heat half the oil over medium heat. Add the sliced onion and cook about 8 minutes until the onion is slightly browned. Add the pepper strips and cook until they're softened, then remove everything to a bowl.

In the meantime slice the cheese into small 1/2 inch cubes and place in an even layer in the warmed pan. Bake for about 10 minutes so the cheese can evenly melt. *Note: Rick has taken great consideration in identifying everything in the back of this book, down to which ingredients and sometimes specific brands, he recommends. I used an authentic Chihuahua cheese a local company makes, but otherwise he suggests Monteray Jack or mozzarella.

Add the second tablespoon of oil to the skillet and add the chorizo, frying until done, about 10 minutes. Drain off excess fat. This was the first time both Johnny and I tried chorizo and it was delicious!

Remove the hot cheese pan from the oven and drain excess fat if necessary. Spread the chile and onion mixture along with the chorizo over top. Place back in the oven for another couple minutes to heat everything.

Scoop onto warmed tortillas (again I bought from a local company that makes them fresh and delivers to stores) of your choice. Johnny opted for corn and I went for flour. The sausage is surprisingly subtle, with complexity and a hint of heat. The poblanos, once roasted and their seeds removed, are not hot, but full of chile flavor. Since being slowly sauteed the onions have a sweetness that lends itself to the other bolder ingredients.

Wednesday, January 27, 2010

Random Updates

I have some yummy Mexican treats coming your way in the next couple posts, but in the meantime here are some updates.

About two weeks ago I won Mara's giveaway and received my package yesterday! Two cans of Progresso soup, a big soup mug/bowl, and an electronic counting jump rope! Thanks again, Mara!

Remember my Musselmann's basket I got last week? A few of you expressed interests in hearing my feedback. So far Johnny and I polished off the natural, no sugar added apple sauce tub (the pink one on the left) in one sitting. It was really delicious and fresh, like taking bites out of an apple. I have to admit I was nervous about the no sugar added aspect because a few summers ago my cousins were eating an all natural apple sauce that was disgusting. But it was a granny apple one, so it was really tart and bitter, this was not!

I only have one container left of the Healthy picks blueberry and pomegranate, no sugar added apple sauce. It's also very good, tastes more blueberry than pomegranate and has a thicker texture than normal applesauce. I saw a tip on Musselmann's facebook page to freeze these little guys for a slushy summertime treat and I'm definitely going to give that a try, it'd be perfect.

I've had the Totally Fruit peach one, which is naturally flavored with peach juice. This was good, but not my favorite. The texture was very smooth, almost like baby food's consistency.

Last, I used the cherry pie filling to make a dessert Friday night while we had company for dinner. The next night Johnny split the remains into two servings and reheated slightly in the microwave.


Heart n Soul Cooking gave me the Happy 101 blog award! I have to list 10 things that make me happy and then 10 bloggers that brighten my day!

1) Johnny! Not to be overly gushy, but he really is the best. Just like Biz and Tony, we met online! He is a web developer and in February 2006 I joined a web site that he ran and we met on the message boards. We emailed back and forth immediately, finding a lot in common and eventually started talking on the phone. In August I dumped my then boyfriend because I'd realized I liked Johnny more than him and in September Johnny flew out to meet me (I was living in Prince Edward Island, Canada at the time). He stayed a week and him leaving was one of the worst days I've ever lived. We didn't last one month apart! In October he flew back to help me pack up Corky, Poe, and my stuff into the back of my Jeep and we drove 26 hours here to Chicagoland where I've lived with him since!

2) My family! It took me awhile to appreciate them because we all have really strong personalities and are stubborn and butt heads. Both sides of my family are very large - my mom has 4 siblings and my dad has 5. This equals a LOT of cousins and extended family, which I was lucky enough to grow up really close to. Sunday dinners usually included at least 20 people. We're spread around the country now, but a lot of them I still do get to see at least once a year.

3) Corky and Poe. Seriously, I have the best pets in the world.

4) YOU! I love being a food blogger and I love our little community. You guys are some great friends.

5) Cooking. When I started this blog I thought I was a pretty good home cook because I'd been cooking for years and had a lot of recipes down pat. Since then I've become a lot more adventurous and you have inspired me with your recipes, making it much more of a creative outlet for me!

6) Books! I love reading and when I am in the mood - watch out because I will read a 300 page novel in 4 or 5 hours.

7) Board games. I love board games and thankfully so does Johnny and his family. My favorites include Balderdash, Scattergories, Monopoly, Hoopla, Stratego, and old-fashioned favorites like Connect 4 and checkers. (We also love card games too, specifically Rummy!)

8) Photos. Thank God Johnny is a web developer and has server room to spare. I love photographs and surround myself by framed pictures of loved ones.

9) Summer! A Chicago summer is nothing like a summer growing up on the coast of North Carolina, but it's still a great time of year. I'll always be biased towards summer because of where I grew up, nothing can compare!

10) TV/Movies/Music. My favorites of all of these always make me happy. Favorite TV show of all time is Firefly, favorite movie of all time is Breakfast at Tiffany's, and favorite band is Green Day!

And finally, the 10 bloggers that light up my day are:

Biz at Biggest Diabetic Loser
Sophia of Burp & Slurp~
Laura at Hey What's for Dinner, Mom?
Allie at Live Laugh Eat
Michelle of Lucky Taste Buds
Sarah at No Whey, Mama
Alisa at One Frugal Foodie
Amy of Please Don't Eat Me!
Cyndi of So Much More Than a Mom
Mara of What's for Dinner?

Monday, January 25, 2010

Make-your-own Pizza Night!

Growing up we always had make-your-own pizza nights! My mom would get the little pre-made pizza crusts and we'd use up leftover sauce. The toppings changed based on our cravings and what leftovers we had on hand to use up.

Ever since Biz posted her easy pizza dough recipe, when Johnny and I now have make-your-own pizza nights, we use that instead of the pre-made crusts. If you haven't tried it yet, you should! It's really easy and once you buy the yeast it's stuff always on hand and readily available. You can also easily turn it into calzones!

Tonight I just whipped the dough up in a bowl because I didn't want to wash my Cuisinart! I also made a slight adjustment to the recipe with the addition of garlic powder, which I think made it really delicious and special!

2 1/2 cups flour
1 tsp Kosher salt
1/2 tsp garlic powder
2 1/4 tsp yeast (or1 pkg)
1 cup warm water
1 Tbsp olive oil

Measure the flour, salt, and garlic powder into a medium sized mixing bowl and whisk to combine. Mix the yeast with the warm water and allow to sit for 5 minutes to activate. The water will become a creamy tan color and the top will foam a bit. Stir the olive oil into the yeast mixture and then pour slowly into the dry ingredients. Stir to mix everything and add up to 1/4 cup more flour if necessary to get the desired dough consistency. Knead for a few minutes and then leave in the bowl while you get the rest of the ingredients ready.

Tonight I was exceptionally lazy, did not have any jarred sauce on hand, and hadn't thought to thaw sauce from the freezer. I did the next best thing and popped this can open and using my stick blender pureed it right in the can! (These are another of my dad's Dollar Tree finds!) Viola!

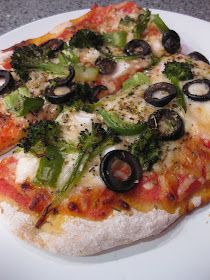
For the toppings I cut up some onion, green pepper, garlic, and black olives. I thawed some frozen chopped spinach and also used up some leftover steamed broccoli. It helps to have all of this prepped and in little bowls ahead of time. We used a mixture of mozzarella cheese and Parmesan cheese for a little more flavor.

Roll out half of the dough to about 12" or a lopsided oval, like mine. Pre-bake this for about 5 minutes in a 425° oven. Remove and then layer the sauce, cheese, and toppings. Bake another 20 minutes or until the cheese is starting to brown. For a chewier crust bake on a pan, for a crispier crust bake directly on the oven rack.

My pizza had onions, green peppers, garlic, black olives, leftover broccoli, and a sprinkle of dried basil and oregano.

Johnny's had spinach, garlic, green peppers, and onions. He went with the Chicago route of putting the toppings on the sauce and the cheese on top.

Again, this is really easy to make! Just because it's dough and it uses yeast doesn't mean it's hard or scary. The first time we made it was last January and I've easily made this 10 times since! Once was this past summer with my three younger cousins - they loved rolling out the dough and personalizing their toppings. I've even been lucky enough to have Biz make it for me herself!

Saturday, January 23, 2010

Cherry and Cream Cheese Shortbread

Ok, I'm not sure this is technically a shortbread, but the recipe the dough was inspired by was from a blueberry shortbread so I'm going with it.

It's kind of like an Entenmann's fruit danish, but with a lot more fruit. Plus I added cream cheese to make it a little more indulgent. (Please excuse the pics, the light over the stove was on and gives everything a yellow tint, plus we had a guest for dinner and I didn't want to spend forever shooting the food!)

For the "dough:"
2/3 cup sugar
6 Tbsp butter, softened
1 egg
1 cup flour
1/2 tsp lemon rind

For the filling:
1 21 oz. can of pie filling, your choice (I used cherry from my gift basket)
4 oz. (half box) cream cheese (1/3 less fat Philadelphia)

Cream the butter and sugar. Add the egg and beat until light and fluffy. Add flour and lemon rind. Spread evenly in the bottom of a greased 8x8" baking dish.

Cut the 4 oz. of cream cheese into small cubes and dollop over the dough.

Spread the can of fruit pie filling overtop everything, evenly.

Bake in a 325° oven for approximately 45 minutes. Mine was moving a little slow so I raised the temperature to 350° for the last 10 minutes. Allow to cool slightly and spoon onto a plate and enjoy!

Thursday, January 21, 2010

Chicken Cordon Bleu

I'm so glad I saw Biz's chicken cordon bleu earlier today! I hadn't thawed anything for our dinner and Johnny's co-worker was coming over. I was afraid I'd have to go outside in rainy, freezing weather just to grab one or two items at the grocery store. After seeing this, I grabbed chicken from the freezer and knew I had leftover ham in the fridge and cheese from my mom's trip to Italy. Perfect!

5 thin sliced chicken breasts
1/2 cup provolone cheese, cut in slices
1/2 cup ham, cut in slices
salt and pepper to taste

To start, I layed out the thin sliced chicken breasts on a big cutting board. If you buy regular chicken breasts you could pound them out to be thinner to stuff and cook.

Next I took equal amounts of the ham and cheese and covered half of the chicken (widthwise) with them. I folded the other half of the chicken over and secured the end with a toothpick. They looked like little pillows!

The cheese I used was a provolone. My mom brought it back from Italy and the outside has a hard rind, but the inside is very soft and creamy. The flavor is so much better than American provolone cheese! Christo of Chez What? shared a few tips and knowledge about cheese with me after his cheese post yesterday! It's very interesting and informative if you get a chance to read it.

After seasoning the chicken with a little salt and pepper I put a small amount of vegetable oil in a skillet. I seared one side of the chicken on medium high heat for about two minutes and then flipped it and put a lid on. I lowered the temperature to medium and cooked for about five minutes, flipped again and cooked another two minutes with the lid on.

I forgot to get a picture until I'd already started eating and cut into it! At least you can see the inside and the way the cheese melted beautifully.

Anything that fell out the sides I just scooped on top of the chicken. I could have been more diligent in securing all of the edges, but I'm lazy! Served alongside Harvest Grain Blend from Trader Joe's and fresh steamed broccoli.

Tuesday, January 19, 2010

Pasta a la Philly

Last week Laura of Hey What's for Dinner, Mom? posted a pasta recipe with a secret ingredient: Philadelphia cream cheese!

After reading her praises and the fact that her son had three platefuls, I decided to give it a go too! It's super quick for weeknight meals, cooking in the time it takes the pasta to boil! It also scores convenient points with just 5 easy ingredients most of us already have on hand!

The original recipe can be found here, but I made the same changes Laura did (proof that great minds think alike!). Both of us chose to forego ground beef and use homemade sausage. Laura used her homegrown/homemade turkey/duck/goose sausage and I used loose sweet Italian sausage. (My dad made us 15 more pounds while he was here for Christmas, so we're set for another few months!) We also both opted to use a shorter pasta choice instead of spaghetti.


16 oz. box of rigatoni
1 pound sausage (or ground meat of choice)
26 oz. jar of pasta sauce (or 3 cups homemade)
4 oz. (1/2 box) of Philly cream cheese, cut in cubes
Parmesan cheese to top, optional

While the pasta water is coming up to a boil brown the meat in a separate large skillet. Once the meat is cooked through, cook pasta according to directions on the package. Add the sauce and cream cheese (we used 1/3 less fat Philadelphia because their regular contains whey) to the skillet and stir to combine with the meat until the cheese is melted. Drain the pasta and add it to the skillet, tossing everything to coat. Serve with Parmesan cheese on top, if desired. Serves 4-5.

Honestly, I was surprised at how good this was! Johnny wandered into the kitchen to help me brown the sausage and ended up staying while the sauce was created. When he saw I was going to be adding the cream cheese he said a quiet "cooool." After a few bites he agreed it's crazy how big of a difference just adding cream cheese makes.

If you like vodka sauce, you'll like this. It's still very "tomatoey," just with a creamy goodness. You won't be able to put a finger on it, it doesn't taste "cream cheesy," just smooth and more "special" than your normal sauce. I would serve this dish to company it's that good!

Monday, January 18, 2010

It's still a holiday, right!?

I won Healthy Yum's carrot challenge at the end of November. There was a little "snafu" with address exchange and the site being down (it'll be back next month), but it was cleared up two weeks ago. My prize was a Musselman's gift basket and until the UPS man pounded on the door like a cop who meant business lightly tapped at 8 a.m. I forgot to expect it!

Johnny brought in a box that gave no indication of what was inside, but had this sticker affixed:

I always think of A Christmas Story when I see this sticker and have to pronounce it "frageelay," like it's Italian!

Inside the box was this beauty! I had to giggle because it's wrapped in bright Christmassy red and the card says "Happy Holidays." Inside read:

Even if I received it a little late, it's still a holiday today, right!? So, everybody please have a safe and happy Martin Luther King, Jr. Day, ok!?

Onto the goods! I honestly did not expect the basket to contain anywhere near this much!

Two 23 oz. jars of plain apple sauce. One is lite with no sugar added, made with 100% American grown apples. The second is all natural with no sugar added and a portion of the proceeds goes to support the fight against breast cancer.

Two 4-packs of Healthy Picks apple sauce. The flavors are blueberry pomegranate and raspberry açaí. Both are full of antioxidants because the fruit flavors and are no sugar added.

Two 4-packs of Totally Fruit apple sauce. These are peach and strawberry flavored, with no high fructose corn syrup - naturally sweetened by the fruit juice concentrate!

Two cans of Lucky Leaf pie fillings, cherry flavored and lite apple with no sugar added.

Now, I'm not affiliated with this company, I just won their products as a prize, but I have to say that is a really awesome round-up of healthy eating bonus points. No sugar added, no high fructose corn syrup, all natural, made with 100% American grown apples, and even supporting breast cancer!? I'm impressed!

If you're feeling an itch to win something yourself right about now please head on over to Hey What's for Dinner, Mom where Laura is beating her winter blues and blahs this week with giveaways galore! She's already up to giveaway number 5 this morning, so there's plenty of chances for you to enter and win!

Friday, January 15, 2010

Split Pea Soup

When my Dad made sausage, he had the meat ground at a local butcher here. He bought several pork shoulders, which they weighed and then cut the meat off the bone and ground. Because the shoulder is weighed before the meat is cut off the bone, you pay for the bones too and receive them in a small bag with your order.

I saved them in my freezer to make stock or soup with, and I pulled them out yesterday to thaw for the split pea soup. I roasted them in a 400° oven for about an hour beforehand. This gives the soup depth and flavor, but I can pull them out and the finished product is meatless. (Note: I said meatless, not vegetarian!)

Into my crockpot went:

16 oz. bag of dried split peas (no need to soak)
5 roasted pork shoulder bones (or you could use the traditional ham)
1 large onion, chopped
4 carrots, chopped
5 stalks of celery, chopped
1 32 oz. box of beef broth (*see note below)
1 cup water

2 cups broth
seasoning, to taste

Place the first seven ingredients into the crockpot in order. Cook on low for 8-10 hours, or high for 4-6 hours. I chose to cook on high for six hours. At about hour four I checked on it and it had lost a lot of liquid so I added 2 more cups of broth.

After six hours I removed the bones, tasted and seasoned to our tastes using about 1/2 tsp black pepper, and turned it to warm.


*The broth is a brand my Dad found at the Dollar Tree, believe it or not. It's all natural with no MSG and is free of any cholesterol, fat, gluten, and lactose. They sell beef and chicken in 32 oz. cartons. I usually use vegetarian bouillon cubes in everything, but since this is dairy free it's safe for Johnny and gives me the option of using ready-to-use broth sometimes.

Tuesday, January 12, 2010

Pumpkin Ice Cream

Wouldn't you know that Edy's (Dreyer's in some parts of the country) changed the vast majority of their flavors last year (including pumpkin) to New! "Fun Flavors!" with whey as the first ingredient? Yes, whey. Not milk, not cream - a processed additive! Mmmm, "Fun!" indeed!

Johnny had a major craving for pumpkin ice cream a few months ago. Since we can't buy a whey-free version at the store, he came up with his own by adapting The Perfect Scoop's sweet potato ice cream recipe to be a pumpkin ice cream recipe!

This was the third or fourth time Johnny made the pumpkin ice cream this year. He usually uses canned pumpkin, but when he made it for Italy Night, he used fresh pumpkin. Wow, let me tell you, it made a WORLD of difference. The canned version tasted a little tinny to me, but Johnny gobbled it up. The fresh version was velvety goodness and I gobbled it up!

15 oz. can of pumpkin (or about 2 cups fresh pumpkin, which I recommend)
1 cup plus 2 Tbsp milk (we used 1%)
2/3 cup packed light brown sugar
1/4 tsp ground cinnamon
1/2 tsp vanilla extract
pinch of salt
a few drops lemon juice (we used the bottled concentrate)

Combine all of the ingredients (except the lemon juice) in a blender and mix for about 30 seconds. It will taste great at this point, but trust me and add just a few drops of lemon juice and re-blend. It should allow all of the other ingredients to just POP and become brighter, not add any citrus qualities.


Freeze in your ice cream maker according to instructions. Serve immediately in a more soft-serve texture, or freeze to serve later! Please note, however, that homemade ice creams freeze "harder" than commercially aerated versions. You'll need to take them out about 5 minutes before scooping.

Sunday, January 10, 2010

Beef Fried Rice

Johnny wanted to order fried rice for dinner, but I offered to make some at home instead! I still had some leftovers I wanted to use, so this was the perfect opportunity. I was able to use some veggies from the Christmas platter and the steak and mushrooms from Gene & Georgetti's.

2 cups cooked white rice
1 tsp oil
2 cloves garlic, minced
1/2 cup carrots, chopped
1/2 cup brocolli, chopped
1/2 cup snap peas, string removed
3 Tbsp Hoisin sauce
3 Tbsp soy sauce
~1/2 cup leftover steak, chopped
~1/4 cup leftover mushrooms
1 egg

Cook the white rice and set aside. Let your stovetop wok heat up, then add the oil and the veggies (except the mushrooms) and garlic. Put the lid on so they can become tender.

Throw the cooked rice on top and add the sauces. Stir around until everything is incorporated. Make a small well in the center and crack and scramble the egg until it is cooked and then stir to mix.

Finally, add the steak and mushrooms to come up to temperature. These were already full cooked, so they only need to be warmed.